Maintaining your air conditioning system is crucial for its efficiency and longevity. One critical component that requires attention is the pressure switch. Replacing it can seem daunting, but with the right guidance, it’s a manageable DIY task.
By taking on this project yourself, you can save money and ensure your air conditioning system operates safely and effectively. This tutorial will walk you through the steps to replace the pressure switch, providing you with the confidence to tackle this important air conditioning maintenance task.
Key Takeaways
- Understand the importance of maintaining your air conditioning system.
- Learn the steps to replace the pressure switch as a DIY project.
- Discover how to ensure your AC operates safely and efficiently.
- Save money by taking on this task yourself.
- Gain confidence in performing basic air conditioning maintenance.
Understanding AC Pressure Switches
Understanding the role of an AC pressure switch is crucial for maintaining an efficient air conditioning system. The pressure switch is a safety device that monitors the refrigerant pressure in the system and prevents damage by shutting off the compressor when the pressure becomes too high or too low.
What Is an AC Pressure Switch and Its Function
An AC pressure switch is a critical component that affects the overall efficiency and safety of the air conditioning system. Its primary function is to monitor the refrigerant pressure and protect the system from potential damage caused by abnormal pressure levels. For more detailed information on pressure switches, you can visit this resource.
Common Signs of a Faulty Pressure Switch
A faulty pressure switch can manifest through various symptoms, including inconsistent cooling, the compressor not engaging, or the system shutting down unexpectedly. Identifying these signs early can help prevent further damage to the air conditioning system.
Types of AC Pressure Switches
There are different types of AC pressure switches available, including high-pressure switches, low-pressure switches, and dual-pressure switches. Each type serves a specific purpose and is designed to protect the system under various operating conditions.
The choice of pressure switch depends on the specific requirements of the air conditioning system and the manufacturer’s recommendations.
Preparation for Replacement
Before diving into the replacement process, it’s crucial to prepare adequately to ensure a smooth and safe experience. Proper preparation involves gathering the necessary tools and materials, understanding the required replacement parts, and taking necessary safety precautions.
Essential Tools and Materials Needed
To replace your AC pressure switch, you’ll need a set of essential tools and materials. These typically include a refrigerant recovery unit, a manifold gauge set, and a new pressure switch compatible with your AC system. Having the right tools on hand will make the process more efficient.
Required Replacement Parts
The primary replacement part needed is the AC pressure switch itself. Ensure that you purchase a switch that is compatible with your AC system’s specifications. You may also need additional parts such as O-rings or gaskets, depending on the specific requirements of your system.

Safety Equipment
Safety equipment is crucial when working with AC systems. This includes protective gloves, safety glasses, and a face mask to protect against refrigerant exposure. Ensuring you have the proper safety gear will minimize the risk of injury.
Important Safety Precautions
When replacing your AC pressure switch, it’s essential to follow important safety precautions. Always turn off the power to the AC unit before starting work, and ensure the system is properly evacuated before opening it to avoid refrigerant exposure. Following these precautions will help prevent accidents and ensure a successful replacement.
| Safety Precaution | Description |
|---|---|
| Turn Off Power | Ensure the AC unit is powered off before starting work. |
| Evacuate System | Properly evacuate the AC system to avoid refrigerant exposure. |
| Use Protective Gear | Wear protective gloves, safety glasses, and a face mask. |
Step-by-Step Process to Replace AC Pressure Switch
The process of replacing an AC pressure switch involves several key steps that must be followed carefully to ensure a successful outcome. This guide will walk you through the necessary procedures, from disconnecting power to the AC unit to recharging the system if necessary.
Disconnecting Power to the AC Unit
Before starting the replacement process, it’s crucial to disconnect power to the AC unit to prevent any accidental start-ups or electrical shocks. Locate the circuit breaker or fuse that controls power to the AC unit and switch it off. Verify that the unit is completely powered down before proceeding.
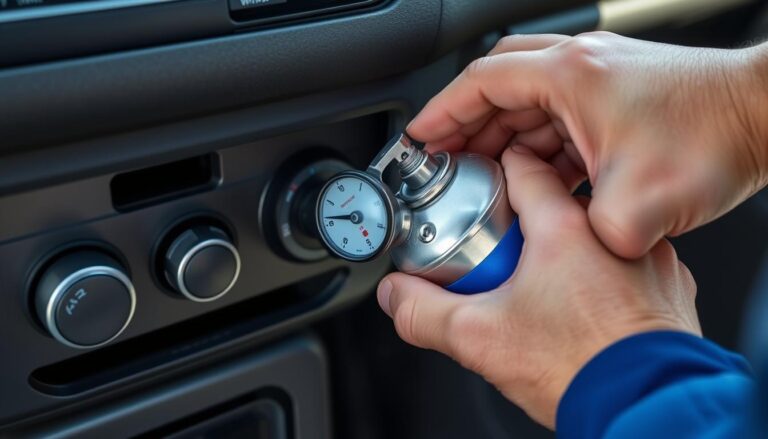
Locating the Pressure Switch
The next step is to locate the pressure switch within the AC system. The switch is typically found near the compressor or along the refrigerant lines. Consult your vehicle’s repair manual or manufacturer’s instructions for specific guidance on locating the pressure switch in your particular vehicle.

Recovering Refrigerant (if necessary)
If your AC system is not designed to be worked on without recovering the refrigerant, you’ll need to use a refrigerant recovery machine to safely remove the refrigerant from the system. This step is crucial for systems that are not sealed or if you’re working on a system that’s still charged. For more information on handling refrigerant, refer to guides on AC maintenance.
Removing the Old Pressure Switch
To remove the old pressure switch, you’ll first need to disconnect its electrical connections and then remove it from the system.
Disconnecting Electrical Connections
Carefully identify and disconnect the electrical connectors attached to the pressure switch. These may be clipped, screwed, or bolted in place. Take note of the wiring configuration to ensure you can correctly reconnect the new switch later.
Removing the Switch from the System
Once the electrical connections are disconnected, you can remove the pressure switch from its mounting location. This may involve unscrewing or unclipping it from the refrigerant line or compressor. Be cautious not to damage surrounding components.
Installing the New Pressure Switch
With the old switch removed, you can now install the new pressure switch, ensuring it’s properly positioned and connected.
Proper Positioning and Connection
Mount the new pressure switch in its designated location, ensuring it’s securely fastened. Reconnect the electrical connections according to the notes you took during disconnection. Make sure all connections are secure and not loose.
Securing Electrical Connections
Double-check that all electrical connections are properly secured. This may involve tightening screws, clips, or bolts. Ensure that the wiring is not pinched or damaged during the connection process.
Recharging the System (if necessary)
If you had to recover the refrigerant, you’ll need to recharge the system with the appropriate type and amount of refrigerant. Use a refrigerant charging kit and follow the manufacturer’s instructions for the correct procedure.
| Step | Description | Notes |
|---|---|---|
| 1 | Disconnect power to the AC unit | Ensure safety by verifying the unit is powered down |
| 2 | Locate the pressure switch | Consult the vehicle’s repair manual for guidance |
| 3 | Recover refrigerant if necessary | Use a refrigerant recovery machine for systems that are still charged |
| 4 | Remove the old pressure switch | Disconnect electrical connections and remove from the system |
| 5 | Install the new pressure switch | Ensure proper positioning and secure electrical connections |
| 6 | Recharge the system if necessary | Use a refrigerant charging kit and follow manufacturer’s instructions |
Testing and Troubleshooting
Testing and troubleshooting are vital steps after replacing the AC pressure switch to guarantee optimal performance. This process ensures that the air conditioning system operates efficiently and effectively.
Powering Up the System
Begin by powering up the AC system. Check the circuit breaker or fuse related to the AC unit to ensure it hasn’t tripped or blown. Turn on the AC and listen for any unusual noises.
Checking for Proper Operation
Verify that the AC is cooling properly. Check the air temperature coming out of the vents to ensure it’s within the expected range. Also, inspect the system for any signs of leaks or other issues.
Common Issues After Replacement
Some common issues after replacing the AC pressure switch include improper cooling, strange noises, or the system not turning on. Refer to the table below for troubleshooting tips.
| Issue | Possible Cause | Solution |
|---|---|---|
| AC not cooling | Incorrect refrigerant level | Check and adjust refrigerant level |
| Strange noises | Loose components | Tighten loose parts |
When to Call a Professional
If you encounter persistent issues or are unsure about any aspect of the troubleshooting process, it’s recommended to seek professional AC help. Complex problems may require specialized tools and expertise.
Maintaining Your Air Conditioning System
Replacing the AC pressure switch is a crucial step in ensuring your air conditioning system operates efficiently. By following the DIY tutorial outlined in this article, you’ve taken a significant step towards maintaining your AC unit. Regular AC maintenance is essential to prolong the lifespan of your system and prevent costly repairs.
To keep your air conditioning system running smoothly, consider incorporating DIY AC repair into your maintenance routine. Simple tasks like cleaning the condenser coils and checking for refrigerant leaks can make a significant difference. For more complex issues, don’t hesitate to seek professional help.
By staying on top of AC maintenance and being proactive with DIY AC repair, you can enjoy a cooler, more comfortable home while minimizing the risk of unexpected breakdowns. For additional air conditioning tips and tricks, be sure to consult with a trusted HVAC professional or explore reputable online resources.
FAQ
What is the function of an AC pressure switch?
The AC pressure switch is a safety device that monitors the refrigerant pressure in the air conditioning system and prevents the compressor from operating if the pressure is too high or too low.
How do I know if my AC pressure switch is faulty?
Common signs of a faulty AC pressure switch include the air conditioning system not cooling properly, the compressor not engaging, or the system shutting down due to high or low pressure.
Can I replace the AC pressure switch myself?
Yes, replacing the AC pressure switch can be a DIY-friendly task if you have the necessary tools and follow the proper steps. However, it’s essential to take necessary safety precautions and consider seeking professional help if you’re unsure.
What tools are required to replace an AC pressure switch?
The necessary tools may include a wrench, pliers, screwdrivers, and a refrigerant recovery unit (if necessary). It’s also essential to have safety equipment such as gloves and safety glasses.
How do I troubleshoot issues after replacing the AC pressure switch?
After replacing the AC pressure switch, you should test the system by powering it up and checking for proper operation. If issues persist, you may need to check electrical connections, refrigerant levels, or other components.
What are some common issues that may arise after replacing the AC pressure switch?
Common issues may include leaks, improper refrigerant charging, or electrical connection problems. It’s crucial to identify and address these issues promptly to ensure the system operates efficiently and safely.
When should I call a professional to replace my AC pressure switch?
You should consider calling a professional if you’re unsure about any aspect of the replacement process, if you don’t have the necessary tools or experience, or if you’ve encountered complex issues during or after the replacement.