Owning a premium British brand vehicle involves maintaining complex electronic components. Professional maintenance ensures that handheld remotes stay active and reliable. Drivers often feel frustrated when vehicle entry becomes difficult due to weak signals.
Tracking key fob battery life prevents unexpected failures during busy morning commutes. This problem usually stems from a depleted energy source inside the unit. Prompt action saves time and avoids stress when you are on the move.
Replacing this component is a simple maintenance requirement for every owner. Owners get professional results without expensive dealer visits or special skills. Using premium quality cells extends the duration between swaps significantly.
Transmitters eventually lose their charge after several years of regular use. Most drivers notice a shorter signal range before the power cell dies completely. This article details specific steps for a successful update.
Key Takeaways
- Identify low power signs early.
- Gather necessary gear before starting.
- Select the correct cell type.
- Open the case carefully.
- Test function after assembly.
- Maintain the unit for longevity.
Understanding Your Mini Key Fob and Battery Life
Your Mini key fob is more than just a remote control; it’s a sophisticated device that requires occasional maintenance. The key fob is an integral part of your vehicle’s security and convenience features, allowing you to lock, unlock, and start your car with ease. Understanding how it works and what affects its key fob battery life is essential for ensuring that it continues to function properly.
The Mini Cooper key fob battery is a crucial component that powers the fob’s various functions. The battery life can be influenced by several factors, including usage patterns, environmental conditions, and the quality of the battery itself. For instance, frequent use of the key fob’s remote start feature or exposure to extreme temperatures can drain the battery faster.

To maximize the battery life, it’s essential to understand how the key fob operates. The key fob contains a small circuit board and a battery that sends signals to your vehicle. When you press a button on the fob, it transmits a coded signal to the car’s receiver, which then performs the desired action. If you’re experiencing issues with your key fob, such as a low battery warning, it might be worth exploring troubleshooting steps similar to those used for other vehicle models.
By understanding the basics of your Mini key fob and the factors that affect its battery life, you can take steps to maintain it effectively and ensure that it continues to function reliably.
Signs Your Mini Key Fob Battery Needs Replacement
The Mini key fob is a crucial component of your vehicle’s remote access system, and a failing battery can manifest in several ways. Recognizing the signs of a dying battery can help you address the issue before it leaves you stranded.
Reduced Operating Range
One of the first signs that your Mini key fob battery is weakening is a reduced operating range. If you find that you need to be closer to your vehicle for the key fob to work, it’s likely the battery is losing power. This reduction in range can be gradual, so it’s essential to be aware of any changes in performance.
Delayed or Inconsistent Response Time
A delayed or inconsistent response time from your key fob is another indicator that the battery may need replacement. If you press a button on the fob and there’s a noticeable delay before the vehicle responds, or if the response is inconsistent, it’s a sign that the battery is struggling to provide the necessary power.
Dashboard Warning Messages and Indicators
Modern Mini vehicles often come equipped with sophisticated electronics that can detect when the key fob battery is running low. Dashboard warning messages or indicators can alert you to the need for a battery replacement. Keep an eye on your dashboard for any messages related to the key fob or remote keyless system.
Intermittent Button Functionality
If you notice that certain buttons on your key fob are not working consistently, it could be a sign that the battery is failing. Intermittent button functionality can be frustrating and is a clear indication that the battery is no longer providing reliable power.
To help you better understand the signs and potential solutions, here’s a summary table:
| Sign | Description | Action |
|---|---|---|
| Reduced Operating Range | Key fob needs to be closer to the vehicle to work | Check and replace the battery |
| Delayed Response Time | Noticeable delay between pressing a button and the vehicle’s response | Replace the battery |
| Dashboard Warnings | Warning messages or indicators on the dashboard | Check the dashboard message and replace the battery if indicated |
| Intermittent Button Functionality | Buttons on the key fob do not work consistently | Replace the battery |

Tools and Materials Required for Battery Replacement
Before starting the Mini key fob battery replacement process, it’s crucial to gather the necessary tools and materials. This preparation will ensure that the replacement is done efficiently and effectively.
Essential Tools You Will Need
To replace the battery in your Mini Cooper key fob, you will need a few basic tools. These include a small Phillips screwdriver, a plastic opening tool or a flathead screwdriver for prying open the key fob casing, and a pair of tweezers for handling the battery.
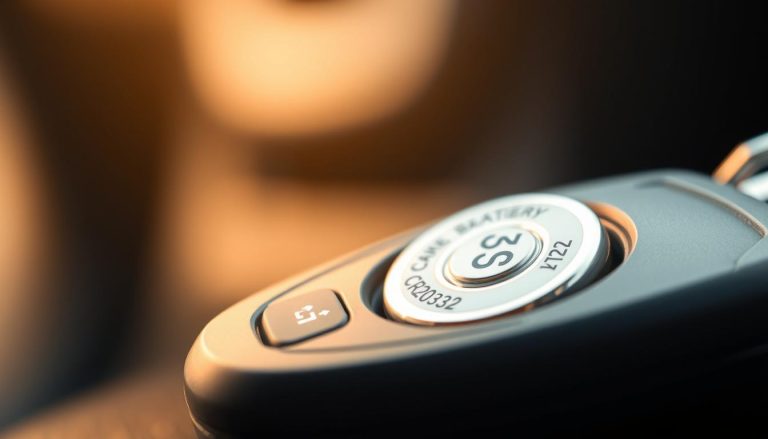
Replacement Battery Specifications
The correct replacement battery for your Mini key fob depends on the model year and type of key fob you have. Typically, Mini Cooper key fobs use a CR2032 or CR2450 battery. It’s essential to check your owner’s manual or consult with a dealership to confirm the correct battery type.
| Mini Cooper Model | Key Fob Battery Type |
|---|---|
| Mini Cooper (2014-2019) | CR2032 |
| Mini Cooper (2020 and later) | CR2450 |
Optional Helpful Items
While not necessary, having a soft cloth or mat to work on can help prevent damage to the key fob or its components during the replacement process. Additionally, having a new battery ready before you start can save time and ensure the process goes smoothly.
Identifying the Correct Battery Type for Your Mini Key Fob
When it comes to replacing the battery in your Mini Cooper key fob, identifying the correct battery type is crucial. The correct battery ensures that your key fob functions properly and prolongs its lifespan.
The Mini Cooper key fob battery type can vary depending on the model and year of your vehicle. It’s essential to consult your owner’s manual or the manufacturer’s website to determine the specific battery type recommended for your Mini Cooper.
Battery Types for Different Mini Cooper Models
Different Mini Cooper models use different battery types. For instance, many Mini Cooper models use a CR2032 or CR2450 battery. However, to confirm the exact type, you should check your owner’s manual or contact a Mini Cooper dealership.
| Mini Cooper Model | Battery Type |
|---|---|
| Mini Cooper (2014-2019) | CR2032 |
| Mini Cooper (2020 and later) | CR2450 |
| Mini Cooper S | CR2032 |
Where to Purchase Quality Replacement Batteries
Once you’ve identified the correct battery type, you can purchase replacement batteries from authorized dealerships, auto parts stores, or reputable online retailers like Amazon or Battery Plus. Ensure that you’re buying from a trusted source to avoid counterfeit products.
Avoiding Counterfeit or Low-Quality Batteries
To avoid counterfeit or low-quality batteries, be cautious of extremely low prices or unfamiliar brands. Purchasing from authorized dealers or well-known retailers can help ensure that you receive a high-quality battery that meets the manufacturer’s specifications.
By following these guidelines, you can successfully identify and purchase the correct battery for your Mini Cooper key fob, ensuring reliable performance and longevity.
How to Change Battery in Mini Key Fob: Complete Instructions
Changing the battery in your Mini key fob is a simple DIY task that can be done at home with the right guidance. This process involves several straightforward steps that, when followed carefully, will have your key fob functioning properly in no time.
Step 1: Remove the Emergency Key Blade
The first step is to remove the emergency key blade from the key fob. This is typically done by pressing a release button and sliding out the key. Ensure you do this gently to avoid damaging the mechanism.
Step 2: Open the Key Fob Casing Carefully
After removing the emergency key, you’ll need to open the key fob casing. This usually involves unscrewing a small screw or releasing a clip. Be cautious not to apply too much pressure, which could damage the casing or the internal components.
Step 3: Locate and Remove the Old Battery
Once the key fob is open, you’ll see the battery held in place by a small clip or soldered connections. Carefully release the clip or desolder the connections to remove the old battery. Note the battery’s orientation for the replacement step.
Step 4: Insert the New Battery with Correct Polarity
Take the new battery and insert it into the key fob, ensuring that the polarity is correct. The positive and negative terminals should match the markings on the key fob’s circuit board. Incorrect polarity can prevent the key fob from functioning.
Step 5: Reassemble the Key Fob Housing
With the new battery in place, reassemble the key fob by reversing the steps you took to disassemble it. Make sure all screws or clips are securely fastened. Avoid overtightening, which can damage the casing.
Step 6: Test All Key Fob Functions
Finally, test your key fob to ensure all buttons are functioning correctly and that the range is satisfactory. If you encounter any issues, you may need to resynchronize the key fob with your vehicle.
Troubleshooting Common Issues After Battery Replacement
Replacing the battery is just the first step; troubleshooting common problems is crucial for optimal key fob performance. After installing a new battery, you may still encounter issues with your Mini key fob. Let’s explore some common problems and their solutions.
Key Fob Still Not Responding
If your key fob is still not responding after battery replacement, there could be several reasons behind this issue. First, ensure that the battery is installed correctly, with the positive and negative terminals aligned as specified. Sometimes, the issue might be with the key fob’s internal circuitry or the car’s receiver.
- Check the battery installation for correctness.
- Try reprogramming the key fob, as sometimes the connection between the fob and the car can be lost.
- Inspect the key fob for any signs of physical damage.
For more complex issues, it might be helpful to consult a professional or refer to the car’s manual for specific troubleshooting guides. You can also check out this guide on reprogramming key fobs for additional insights.
How to Resynchronize Your Mini Key Fob
Resynchronizing your Mini key fob is sometimes necessary, especially if you’ve replaced the battery or if the fob has been out of range for an extended period. The process typically involves a series of steps that help re-establish the connection between the key fob and the car’s computer system.
- Stand close to your car and press the unlock button on your key fob.
- Enter your car and insert the key into the ignition.
- Turn the ignition switch to the “ON” position but do not start the engine.
- Wait for a few seconds and then turn the ignition switch back to the “OFF” position.
- Remove the key and test the key fob to see if it’s working properly.
Dealing with Physical Damage or Worn Components
Physical damage or worn-out components can significantly affect the performance of your Mini key fob. Inspect the key fob regularly for any signs of wear and tear, such as cracks, broken buttons, or corroded battery contacts.
If you notice any damage, consider repairing or replacing the affected parts. For instance, you can clean corroded battery contacts with a soft brush and some alcohol. In cases of severe damage, it might be more cost-effective to replace the key fob altogether.
By following these troubleshooting steps, you can resolve common issues with your Mini key fob and ensure it continues to function reliably.
Tips for Extending Your Mini Key Fob Battery Life
To ensure your Mini key fob remains functional for an extended period, adopting a few simple practices can make a significant difference.
Extending the life of your Mini Cooper key fob battery involves understanding the factors that affect its longevity and taking proactive measures. By doing so, you can avoid the inconvenience of a dead battery and potentially save on replacement costs.
Proper Storage and Handling Practices
One of the key factors in prolonging the life of your Mini key fob battery is how you store and handle the key fob. Avoid exposing the key fob to extreme temperatures, as this can significantly drain the battery. When not in use, store your key fob in a cool, dry place, away from direct sunlight.
Additionally, handling your key fob with care can prevent damage to the internal components. Refrain from pressing the buttons excessively when not in range of your vehicle, as this can cause unnecessary battery drain.
Protecting Your Key Fob from Environmental Factors
Environmental factors such as moisture and physical stress can adversely affect your key fob’s battery life. Keep your key fob dry and avoid exposing it to water or high humidity environments. If your key fob does get wet, dry it immediately to prevent damage.
Using a protective case or cover can also help shield your key fob from physical damage and environmental stressors.
When to Replace Your Battery Proactively
Being proactive about replacing your Mini Cooper key fob battery can save you from being stranded with a dead battery. Typically, a key fob battery lasts between 2 to 3 years. Consider replacing the battery proactively around the 2-year mark or when you notice any signs of weakening, such as reduced range or delayed responses.
| Factor | Impact on Battery Life | Mitigation Strategy |
|---|---|---|
| Extreme Temperatures | Can cause significant drain | Store in a cool, dry place |
| Excessive Button Pressing | Drains battery unnecessarily | Press buttons only when necessary |
| Moisture Exposure | Can damage internal components | Keep dry, use a protective case |
By following these tips and being mindful of how you use and store your Mini Cooper key fob, you can significantly extend its battery life.
Conclusion
Replacing the battery in your Mini key fob is a straightforward process that can be completed with the right tools and a bit of patience. By following the steps outlined in this guide on How to Change Battery in Mini Key Fob, you can ensure your key fob continues to function seamlessly.
Regular maintenance, such as proper storage and handling, can significantly extend the life of your Mini key fob battery. Being proactive about replacing the battery and taking steps to protect your key fob from environmental factors can prevent issues down the line.
By understanding the signs that indicate your Mini key fob battery needs replacement and knowing how to replace it, you can avoid being stranded with a non-functional key fob. Proper care and timely Mini key fob battery replacement are key to maintaining the convenience and security features of your Mini Cooper.
FAQ
Which specific battery type does a Mini Cooper key fob require?
Most modern Mini Cooper models, including the F56 Hardtop, F55 Four-Door, and F60 Countryman, utilize a CR2032 3V lithium coin cell battery. Older R-series models, such as the R56 Hatch or R53, may use a CR2025 or a rechargeable VL2020 battery depending on the specific key design. We recommend using high-quality brands like Panasonic, Energizer, or Duracell to ensure consistent voltage and longevity.
Will I need to reprogram my key fob after changing the battery?
No, replacing the battery in a Mini key fob does not erase the internal immobilizer coding or the RFID chip data. The vehicle should recognize the key immediately. However, if the keyless entry or Comfort Access features do not respond right away, you may need to perform a simple resynchronization by holding the key against the marked area on the steering column while starting the engine.
What does the “Remote Control: Battery Discharged” warning on my dashboard mean?
This is an automated notification from the BMW-Mini onboard computer system. It indicates that the transponder signal strength is weakening. When this message appears on your Mini’s digital display or iDrive screen, it serves as a proactive alert to replace the lithium battery before you lose the ability to unlock the doors or start the car remotely.
Are special tools required to open the Mini key fob casing?
For most third-generation (F-series) fobs, no external tools are strictly necessary; you can use the integrated emergency key blade to pop off the battery cover. For older second-generation (R-series) “saucer” style keys, a small precision flathead screwdriver is often required to gently pry the housing apart without damaging the plastic clips or the waterproof seal.
How can I tell the difference between a dying battery and a broken key fob?
A dying battery typically results in a reduced operating range or intermittent button functionality. If the key fob works only when you are standing directly next to the Mini Clubman or Convertible, the battery is likely the culprit. If the LED indicator (on models equipped with one) does not light up at all after a battery swap, the circuit board or internal micro-switches may have sustained physical damage.
Can I use a generic or budget-brand battery as a replacement?
While generic batteries may fit, it is highly recommended to use name-brand lithium batteries like Sony or Maxell. Budget batteries often have inconsistent discharge rates and a higher risk of leakage, which can cause permanent corrosion to the Mini key fob’s internal electronics. Investing in a premium battery ensures your keyless entry system remains reliable for the full 3-to-4-year lifespan.
How do I resynchronize my Mini key fob if it stops working after a battery change?
To resynchronize, enter your Mini and close all doors. Insert the key into the ignition slot (on older models) or hold the fob against the steering column icon (on newer push-to-start models). Turn the ignition to the “On” position without starting the engine, wait a few seconds, and then turn it off. This should re-establish the link between the transceiver and the key fob.